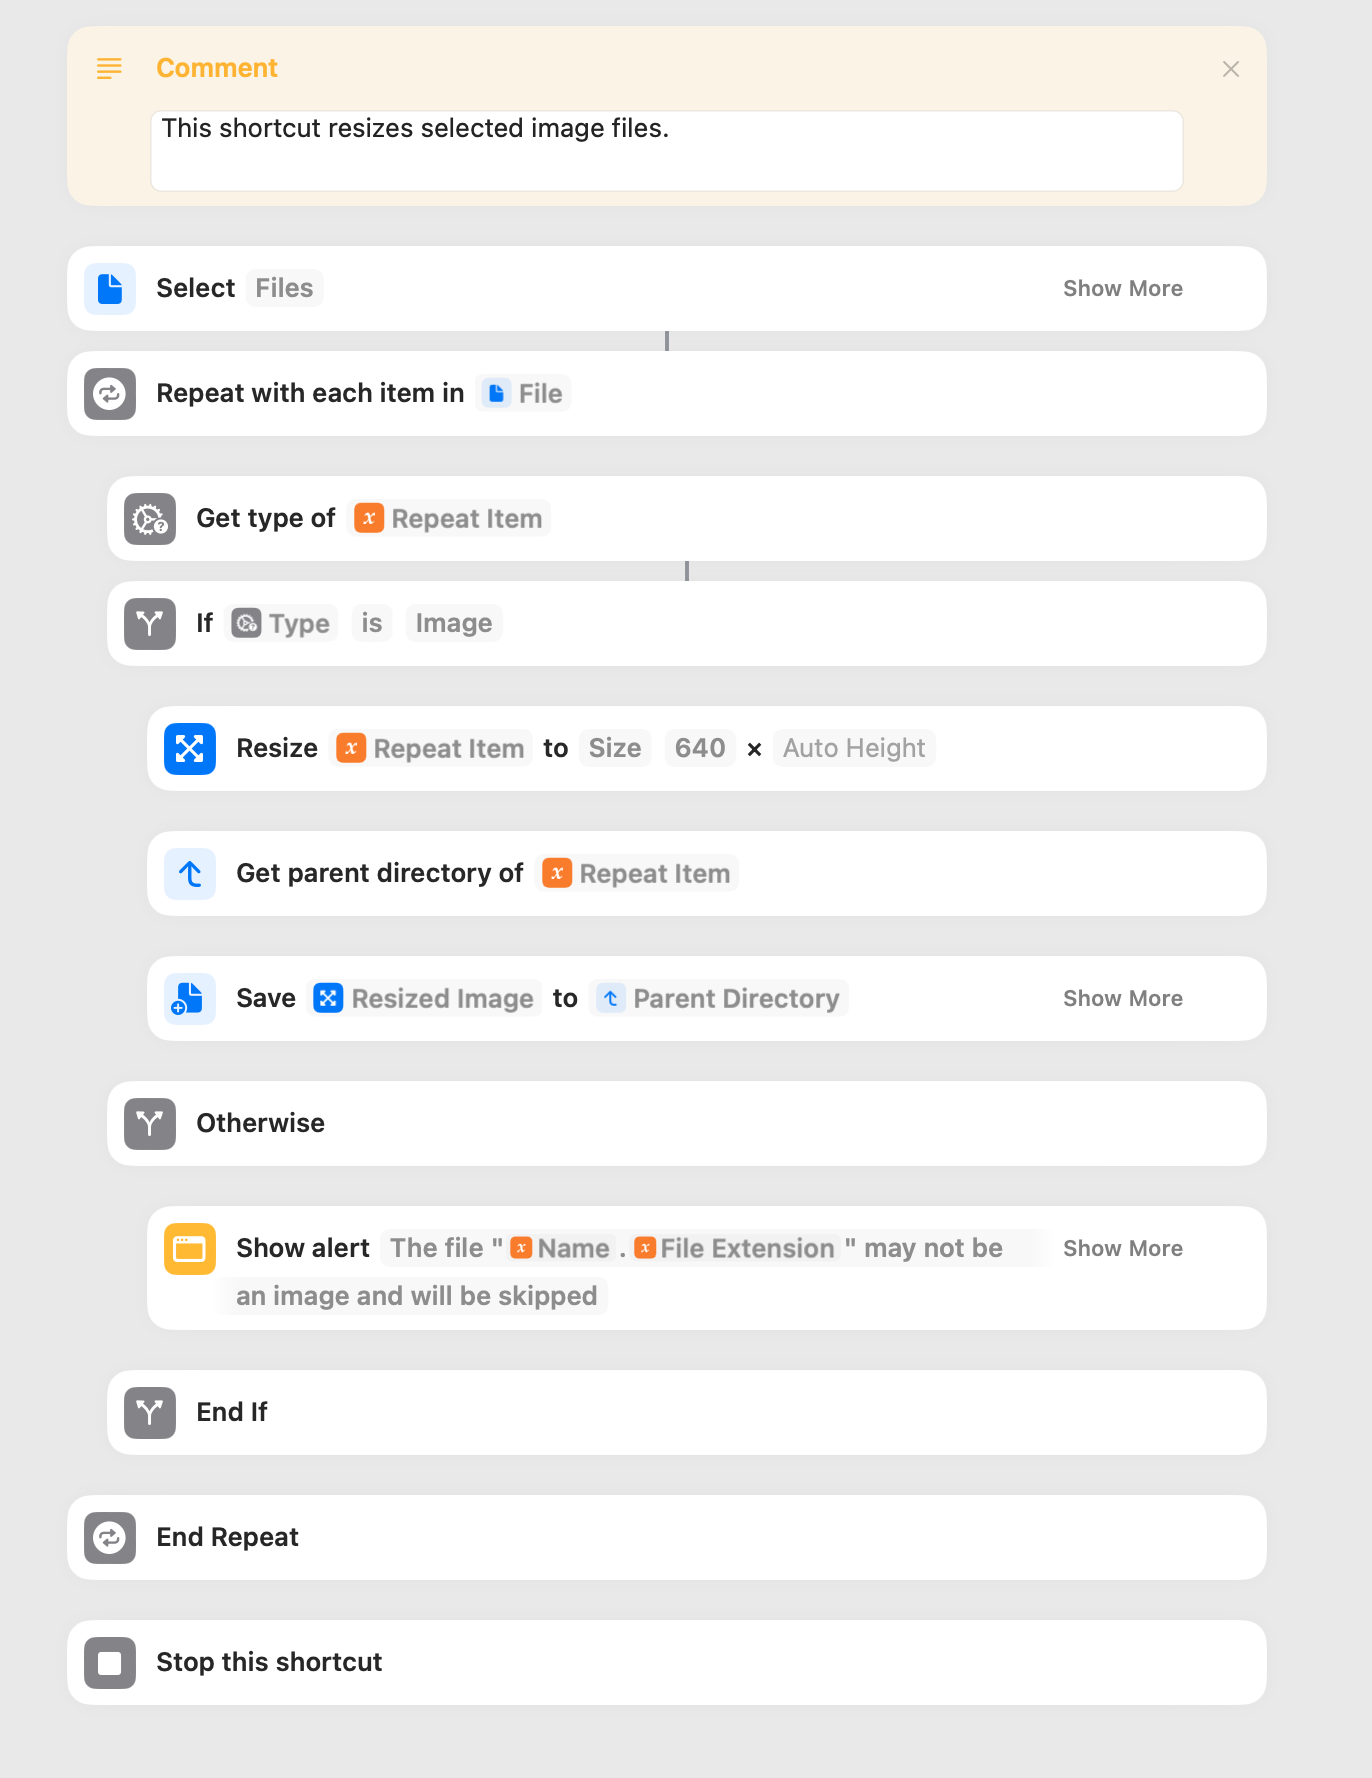
The Shortcuts app has a large number of actions that manipulate or alter images, and examples are convert, resize, crop, flip, mask, overlay (text or image), and remove image background. Most of these are easily implemented and their operation requires no explanation.
I thought I would write an example shortcut in which multiple images are resized. Other actions are then easily substituted.
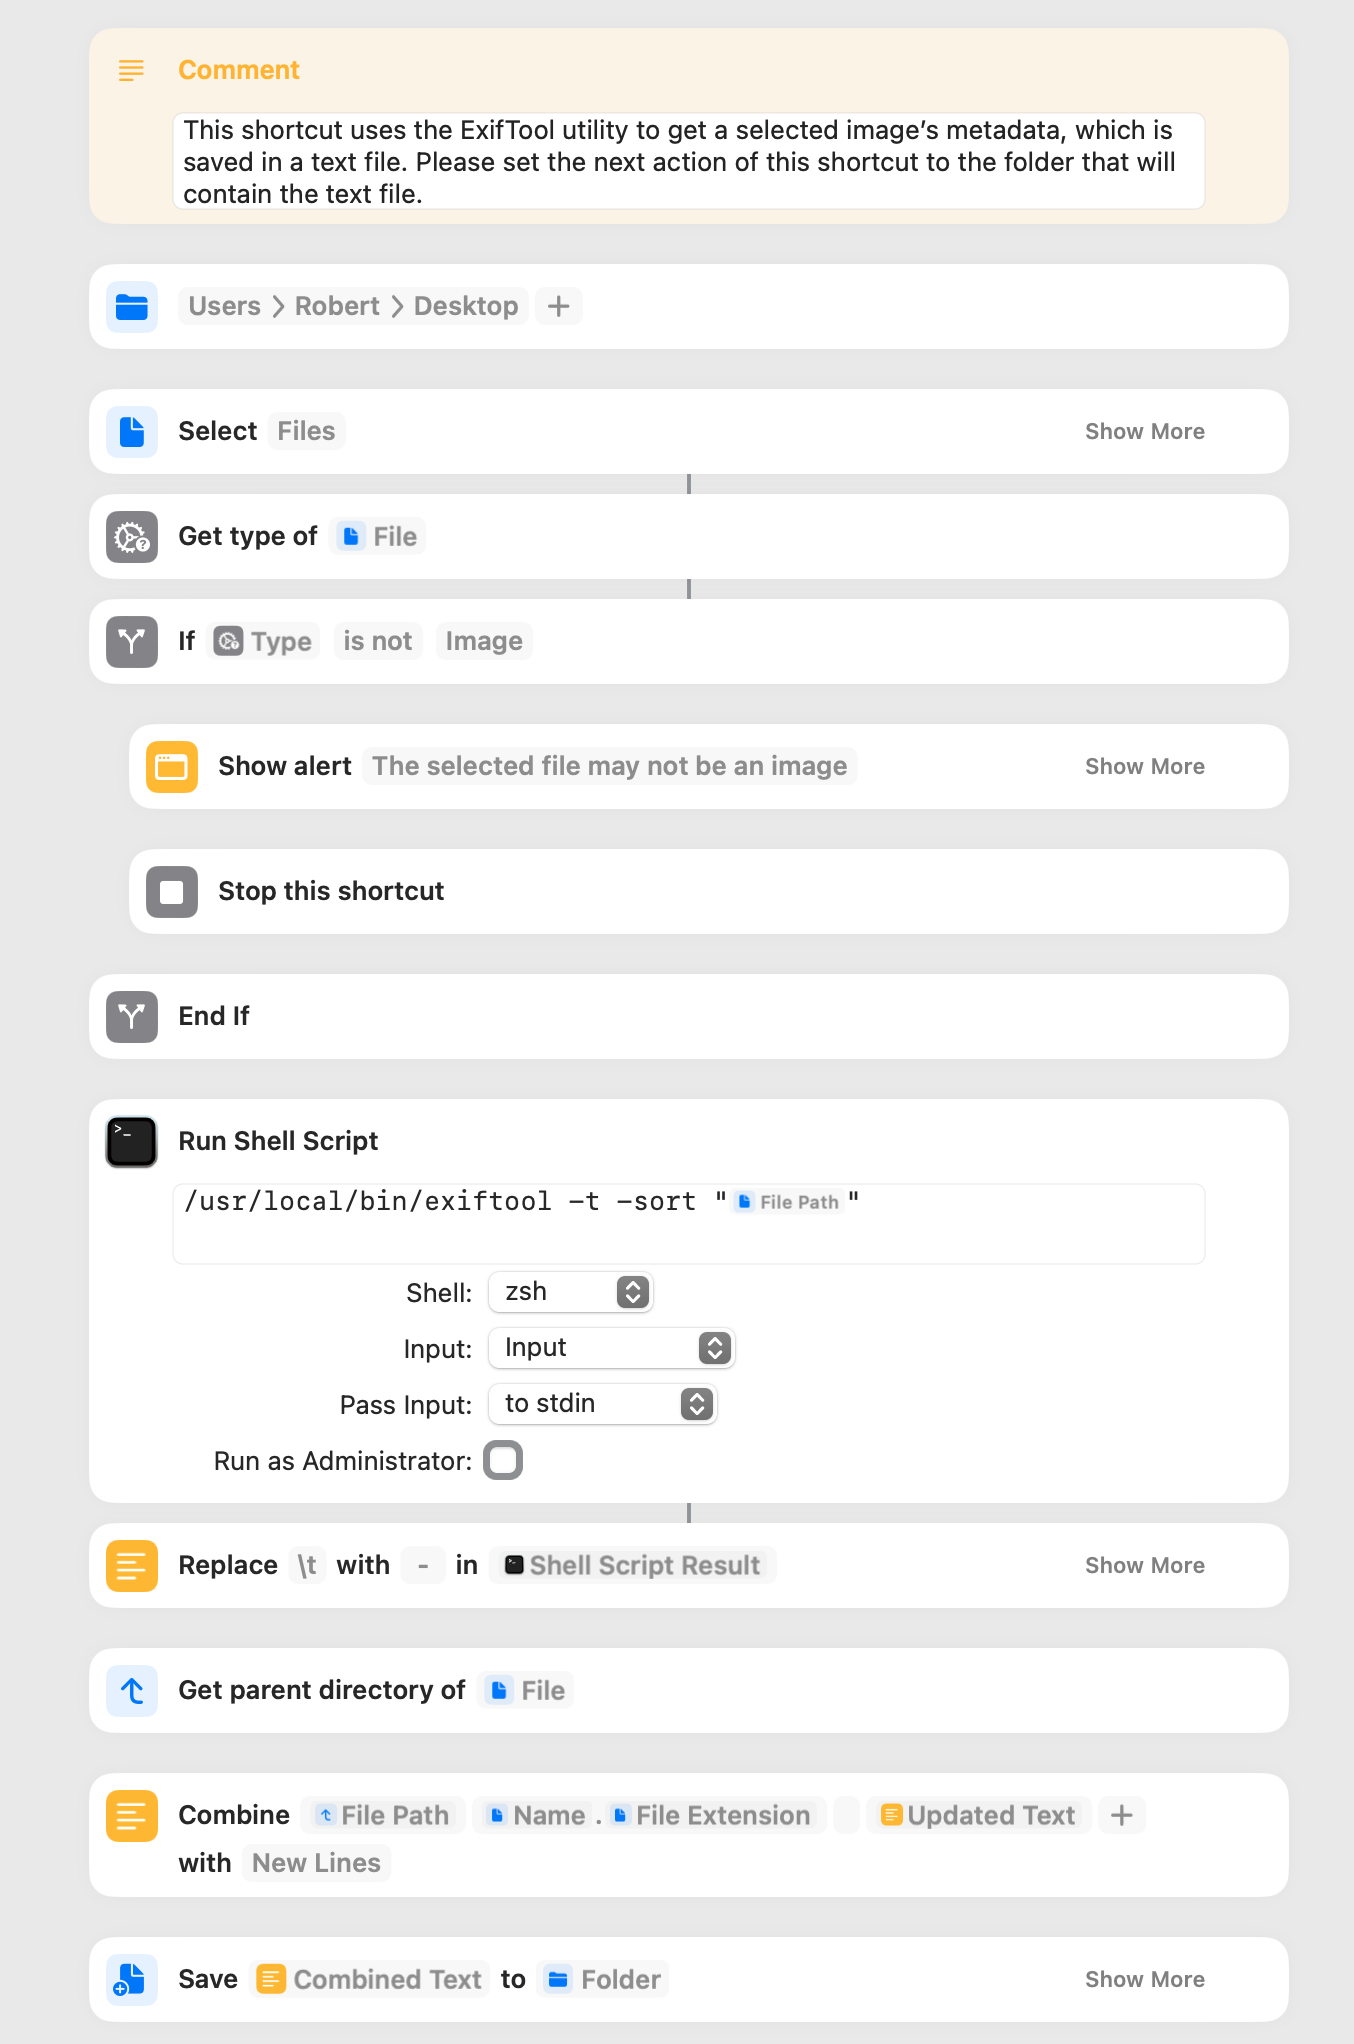
The following shortcut uses the ExifTool utility to remove all Exif data except orientation from a file selected in a Finder window. The selected file is not changed, and a duplicate file is instead created. In limited testing, the shortcut worked reliably on my Sequoia computer, but please test with duplicate files until the reliability of the shortcut is confirmed on your computer.
This shortcut applies a user-input pixel count to the selected image’s width or height, whichever is greater. A new file is created with the original file name but with the word resized appended. I primarily use this shortcut to quickly resize an image before uploading it to a social media site. The following screenshot only shows a portion of the shortcut.
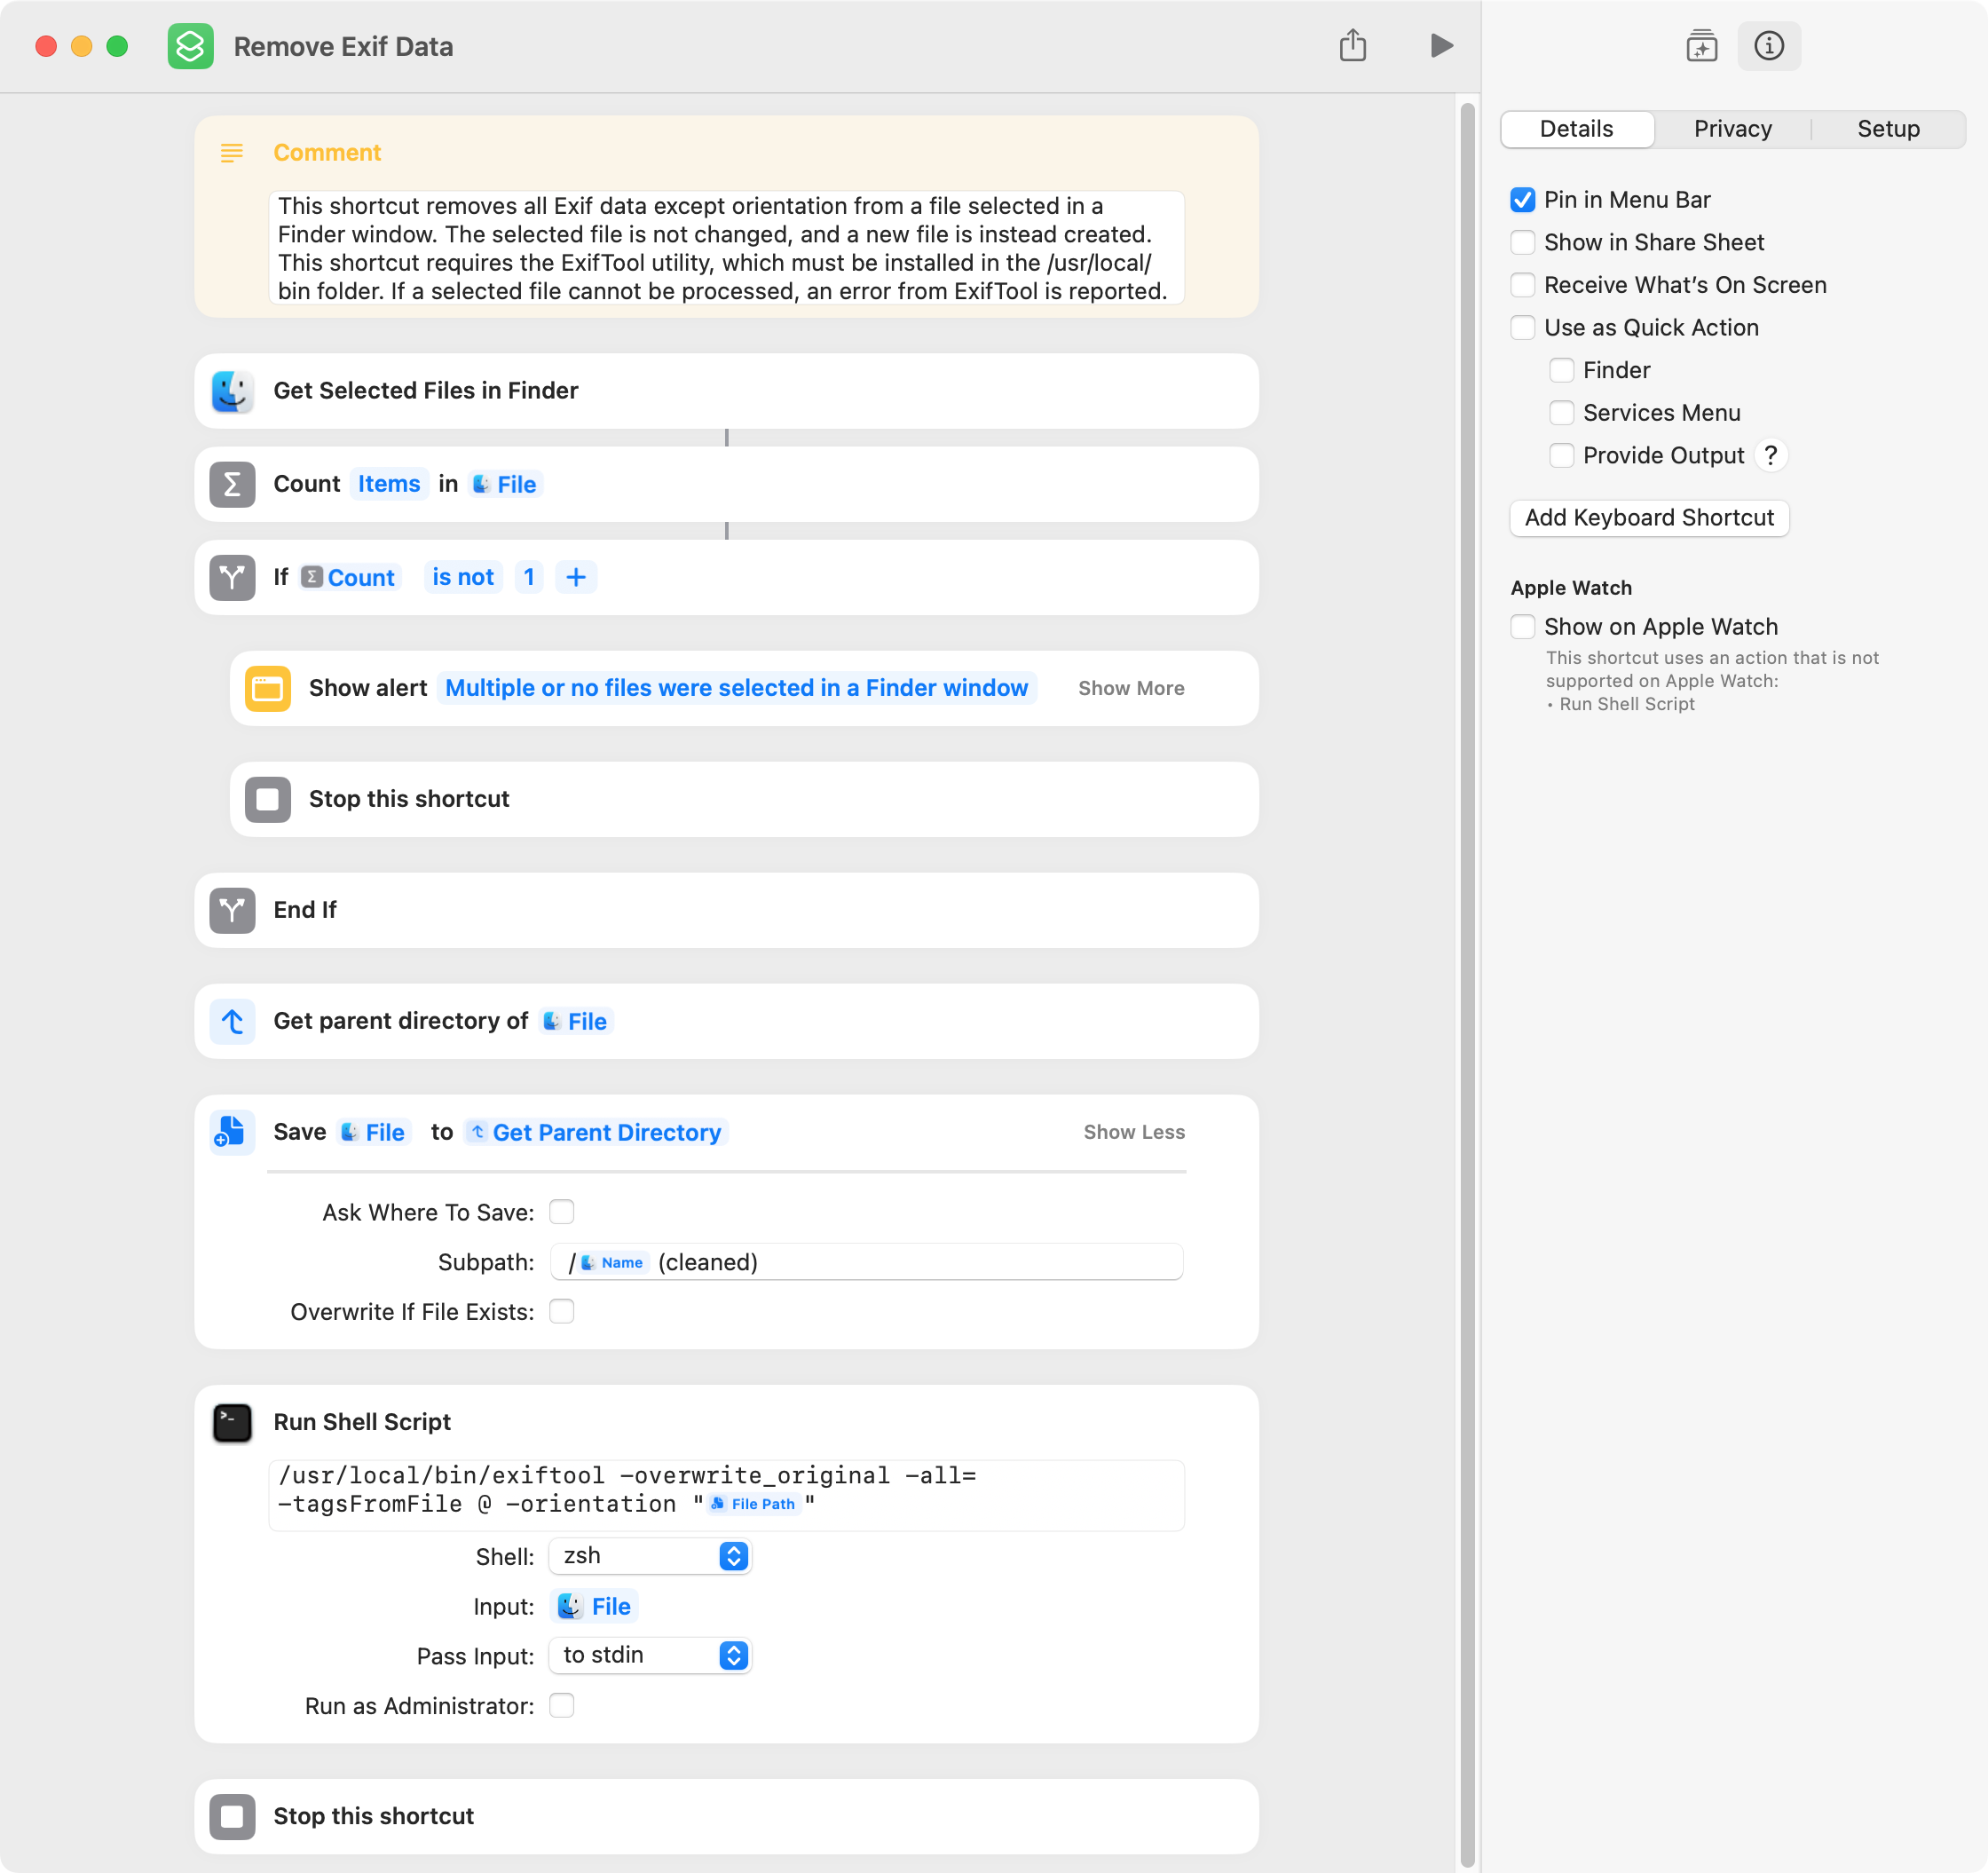
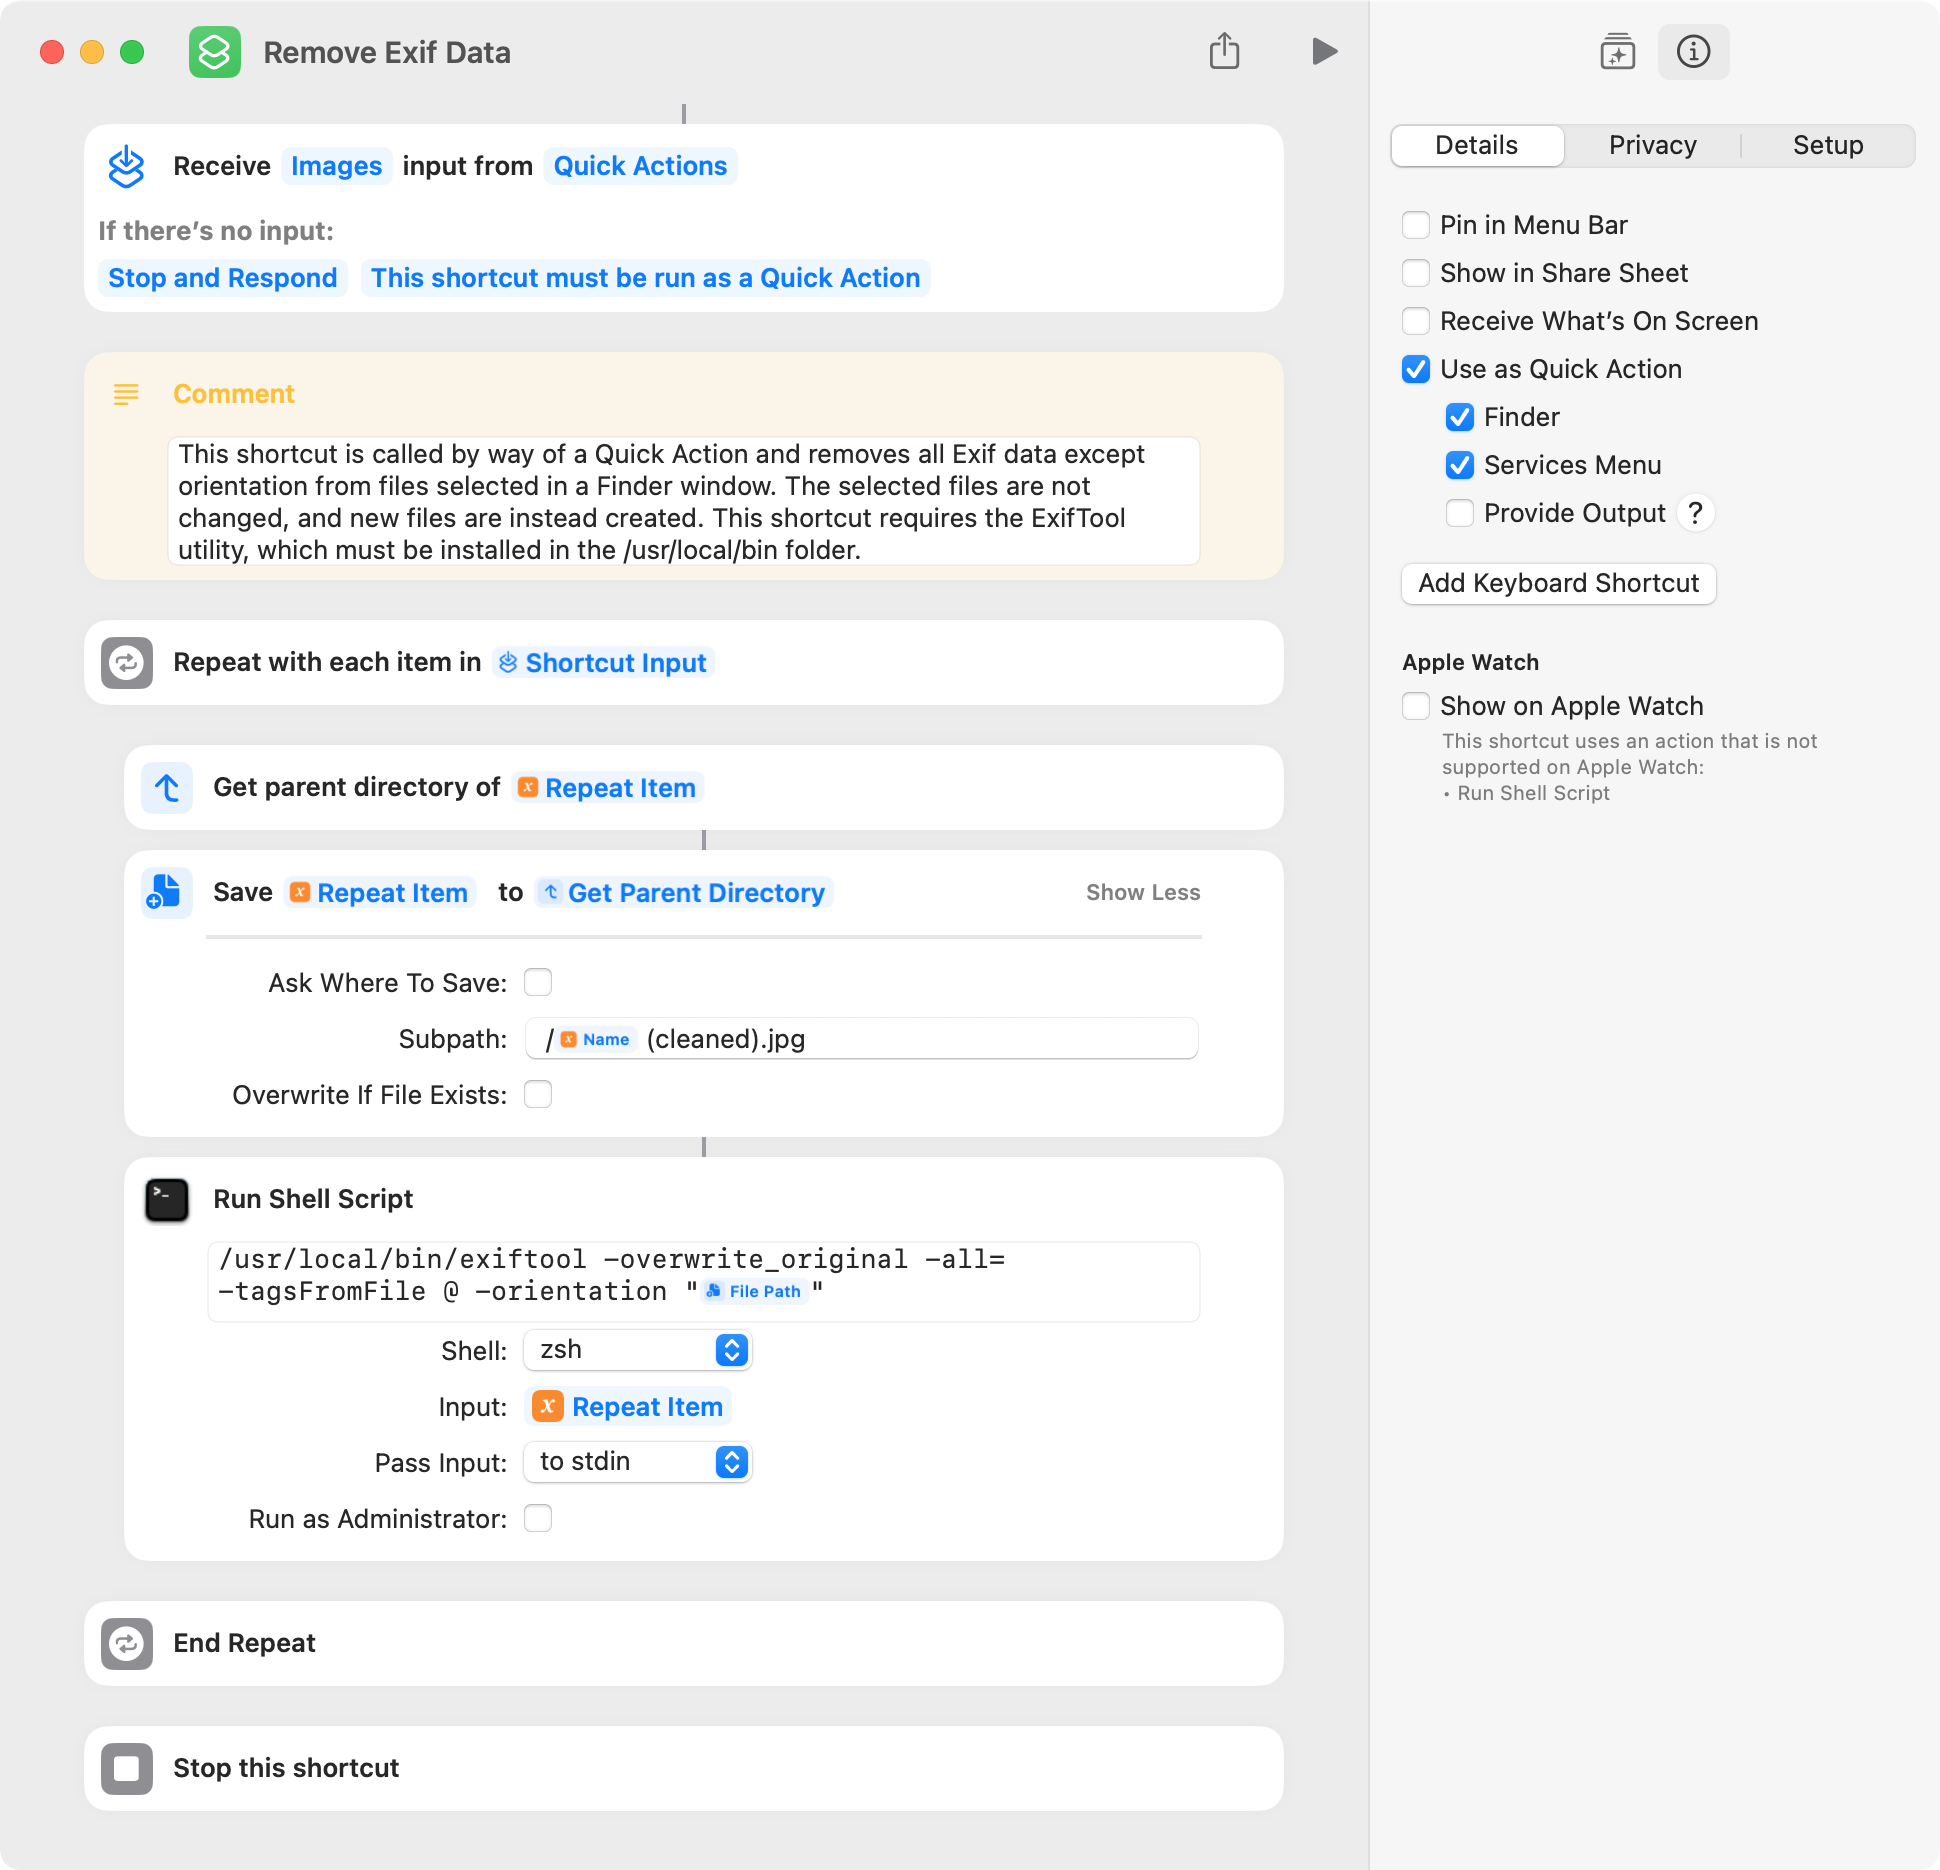
This shortcut removes all Exif data except orientation from files selected in a Finder window. It differs from the shortcut in post 3 in that this shortcut is called by way of a Quick Action and will process multiple files. After installing this shortcut, you may need to check the Finder option (see screenshot) for this shortcut to appear as a Quick Action.
Interesting use of Shortcuts. I quite often take pictures with my iPhone that later on will be sent out via email. To make the size of the photos manageable, I bring the “Resolution” down from 72 to 18. I’ve played with the first Shortcut you posted, but can’t seem to get it working with resolution. The photos are always on my Desktop, in a folder named “Send”.
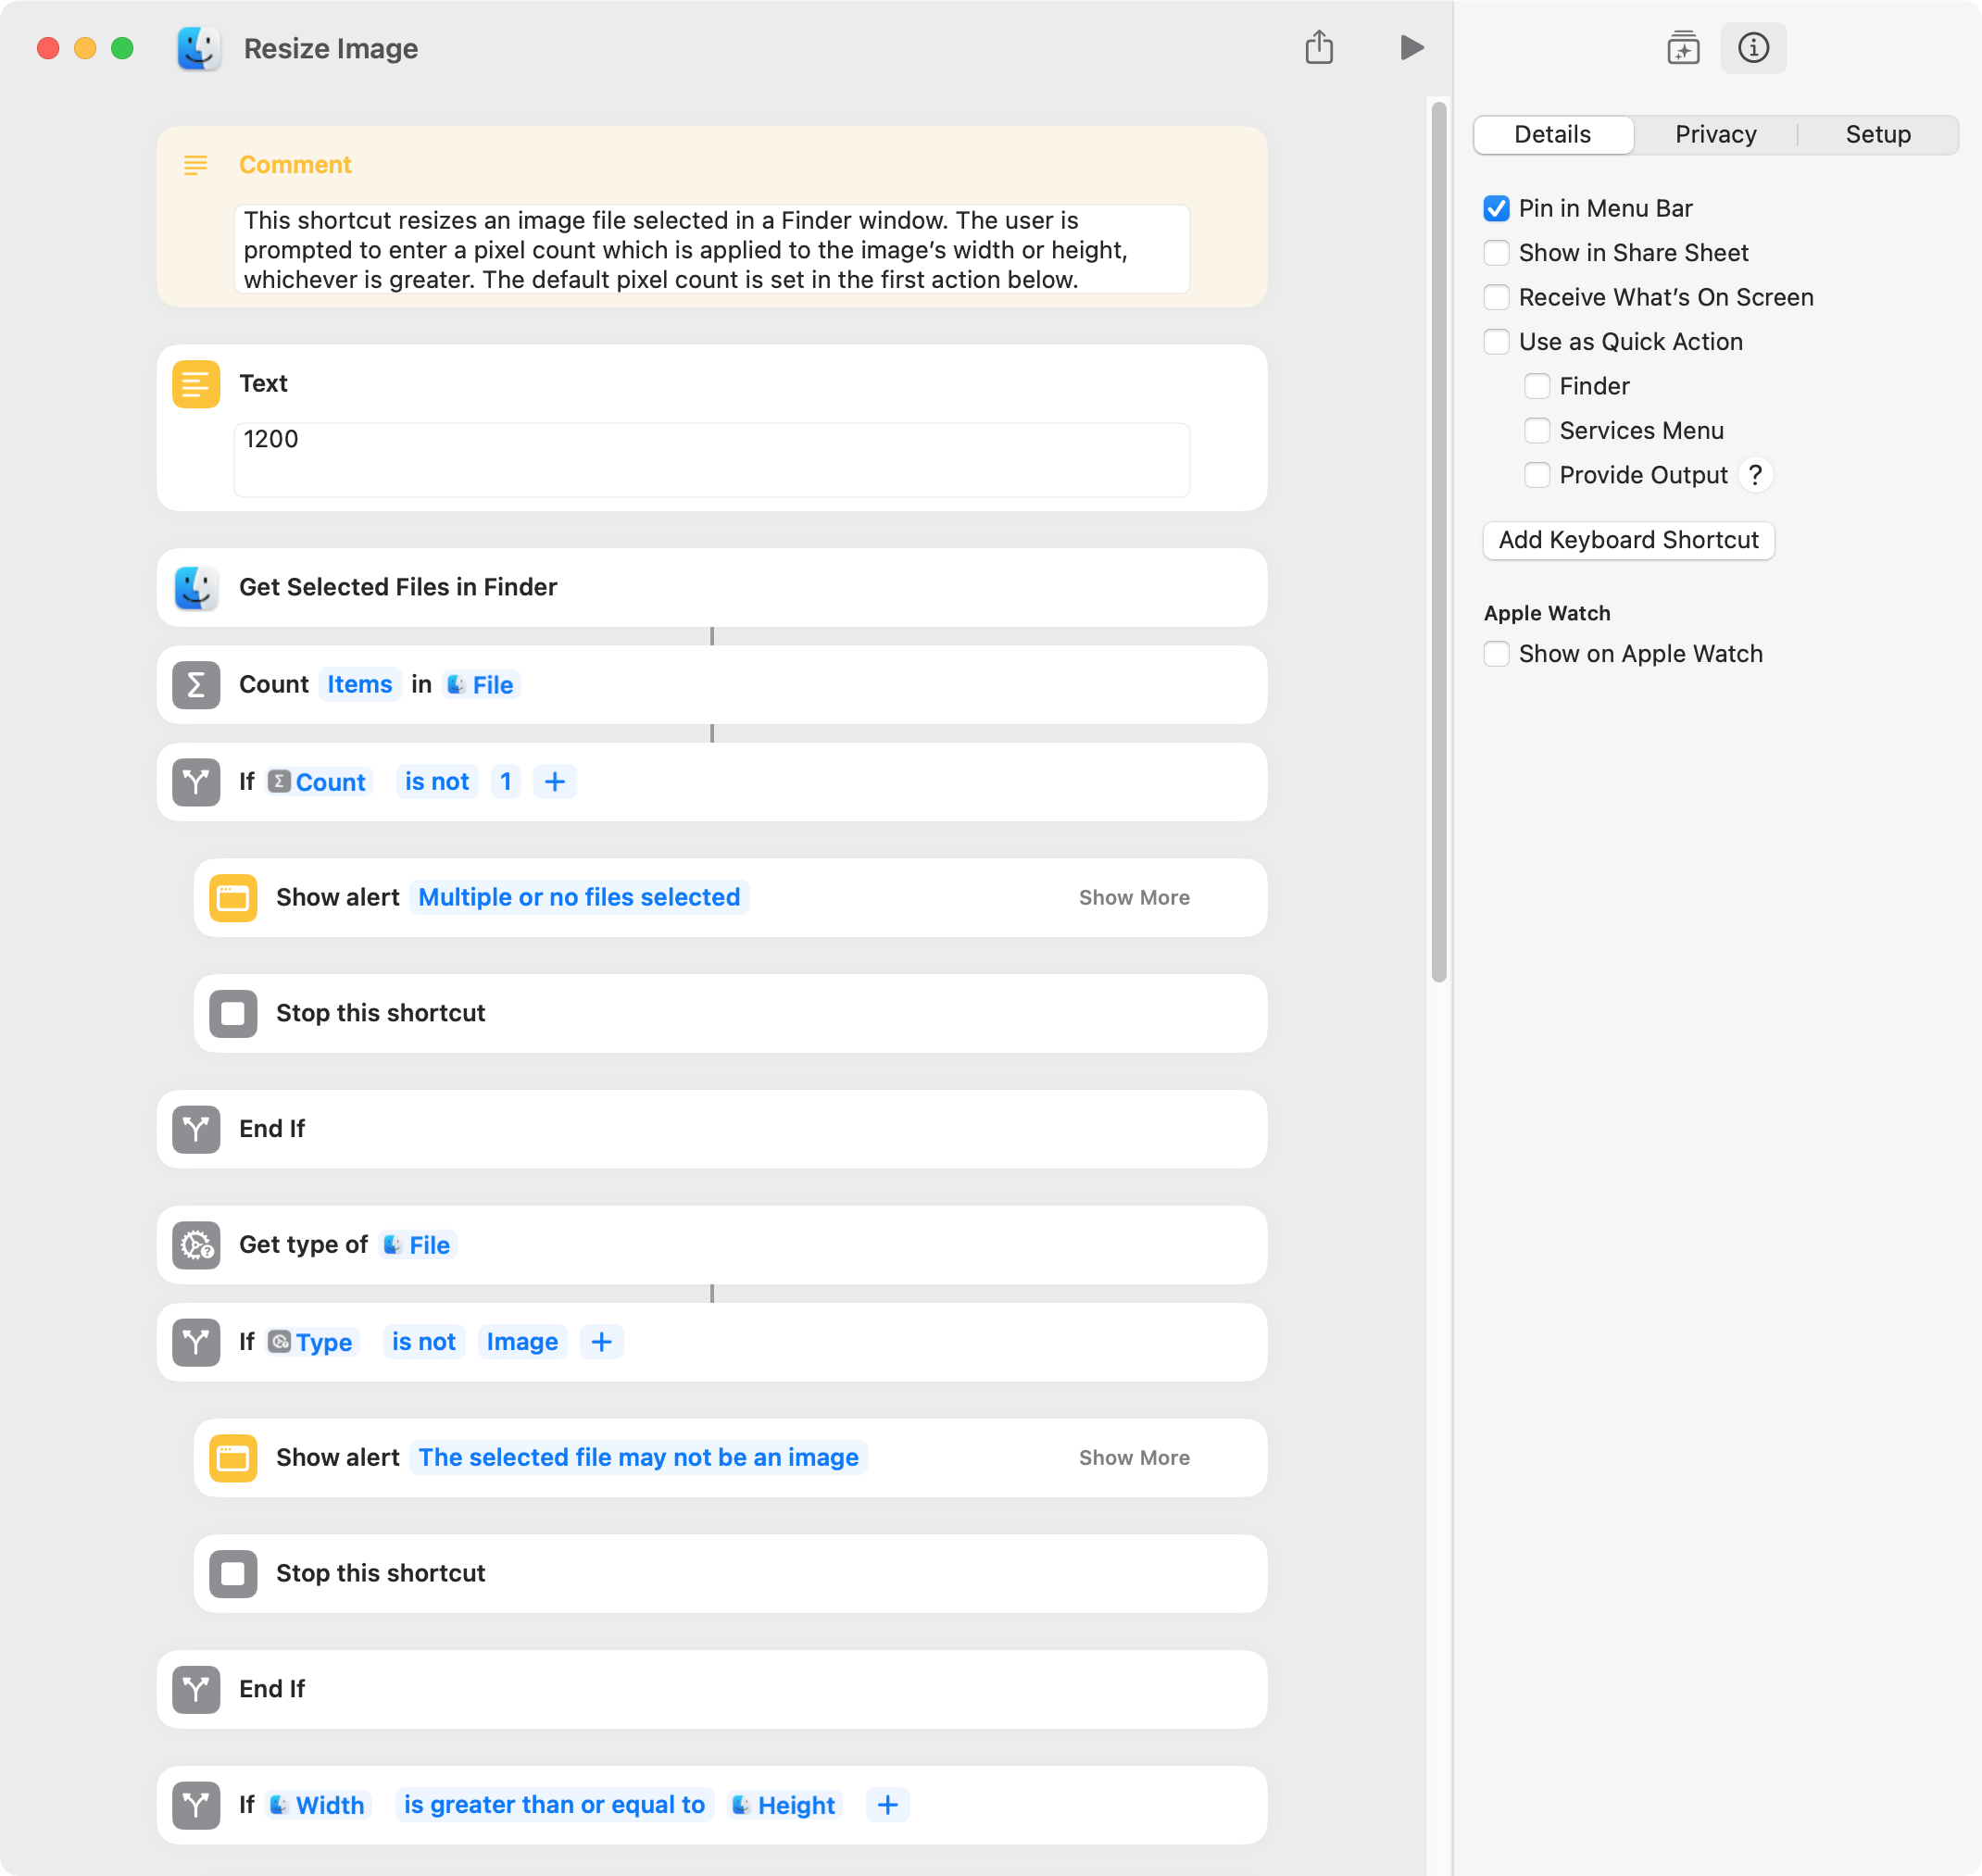
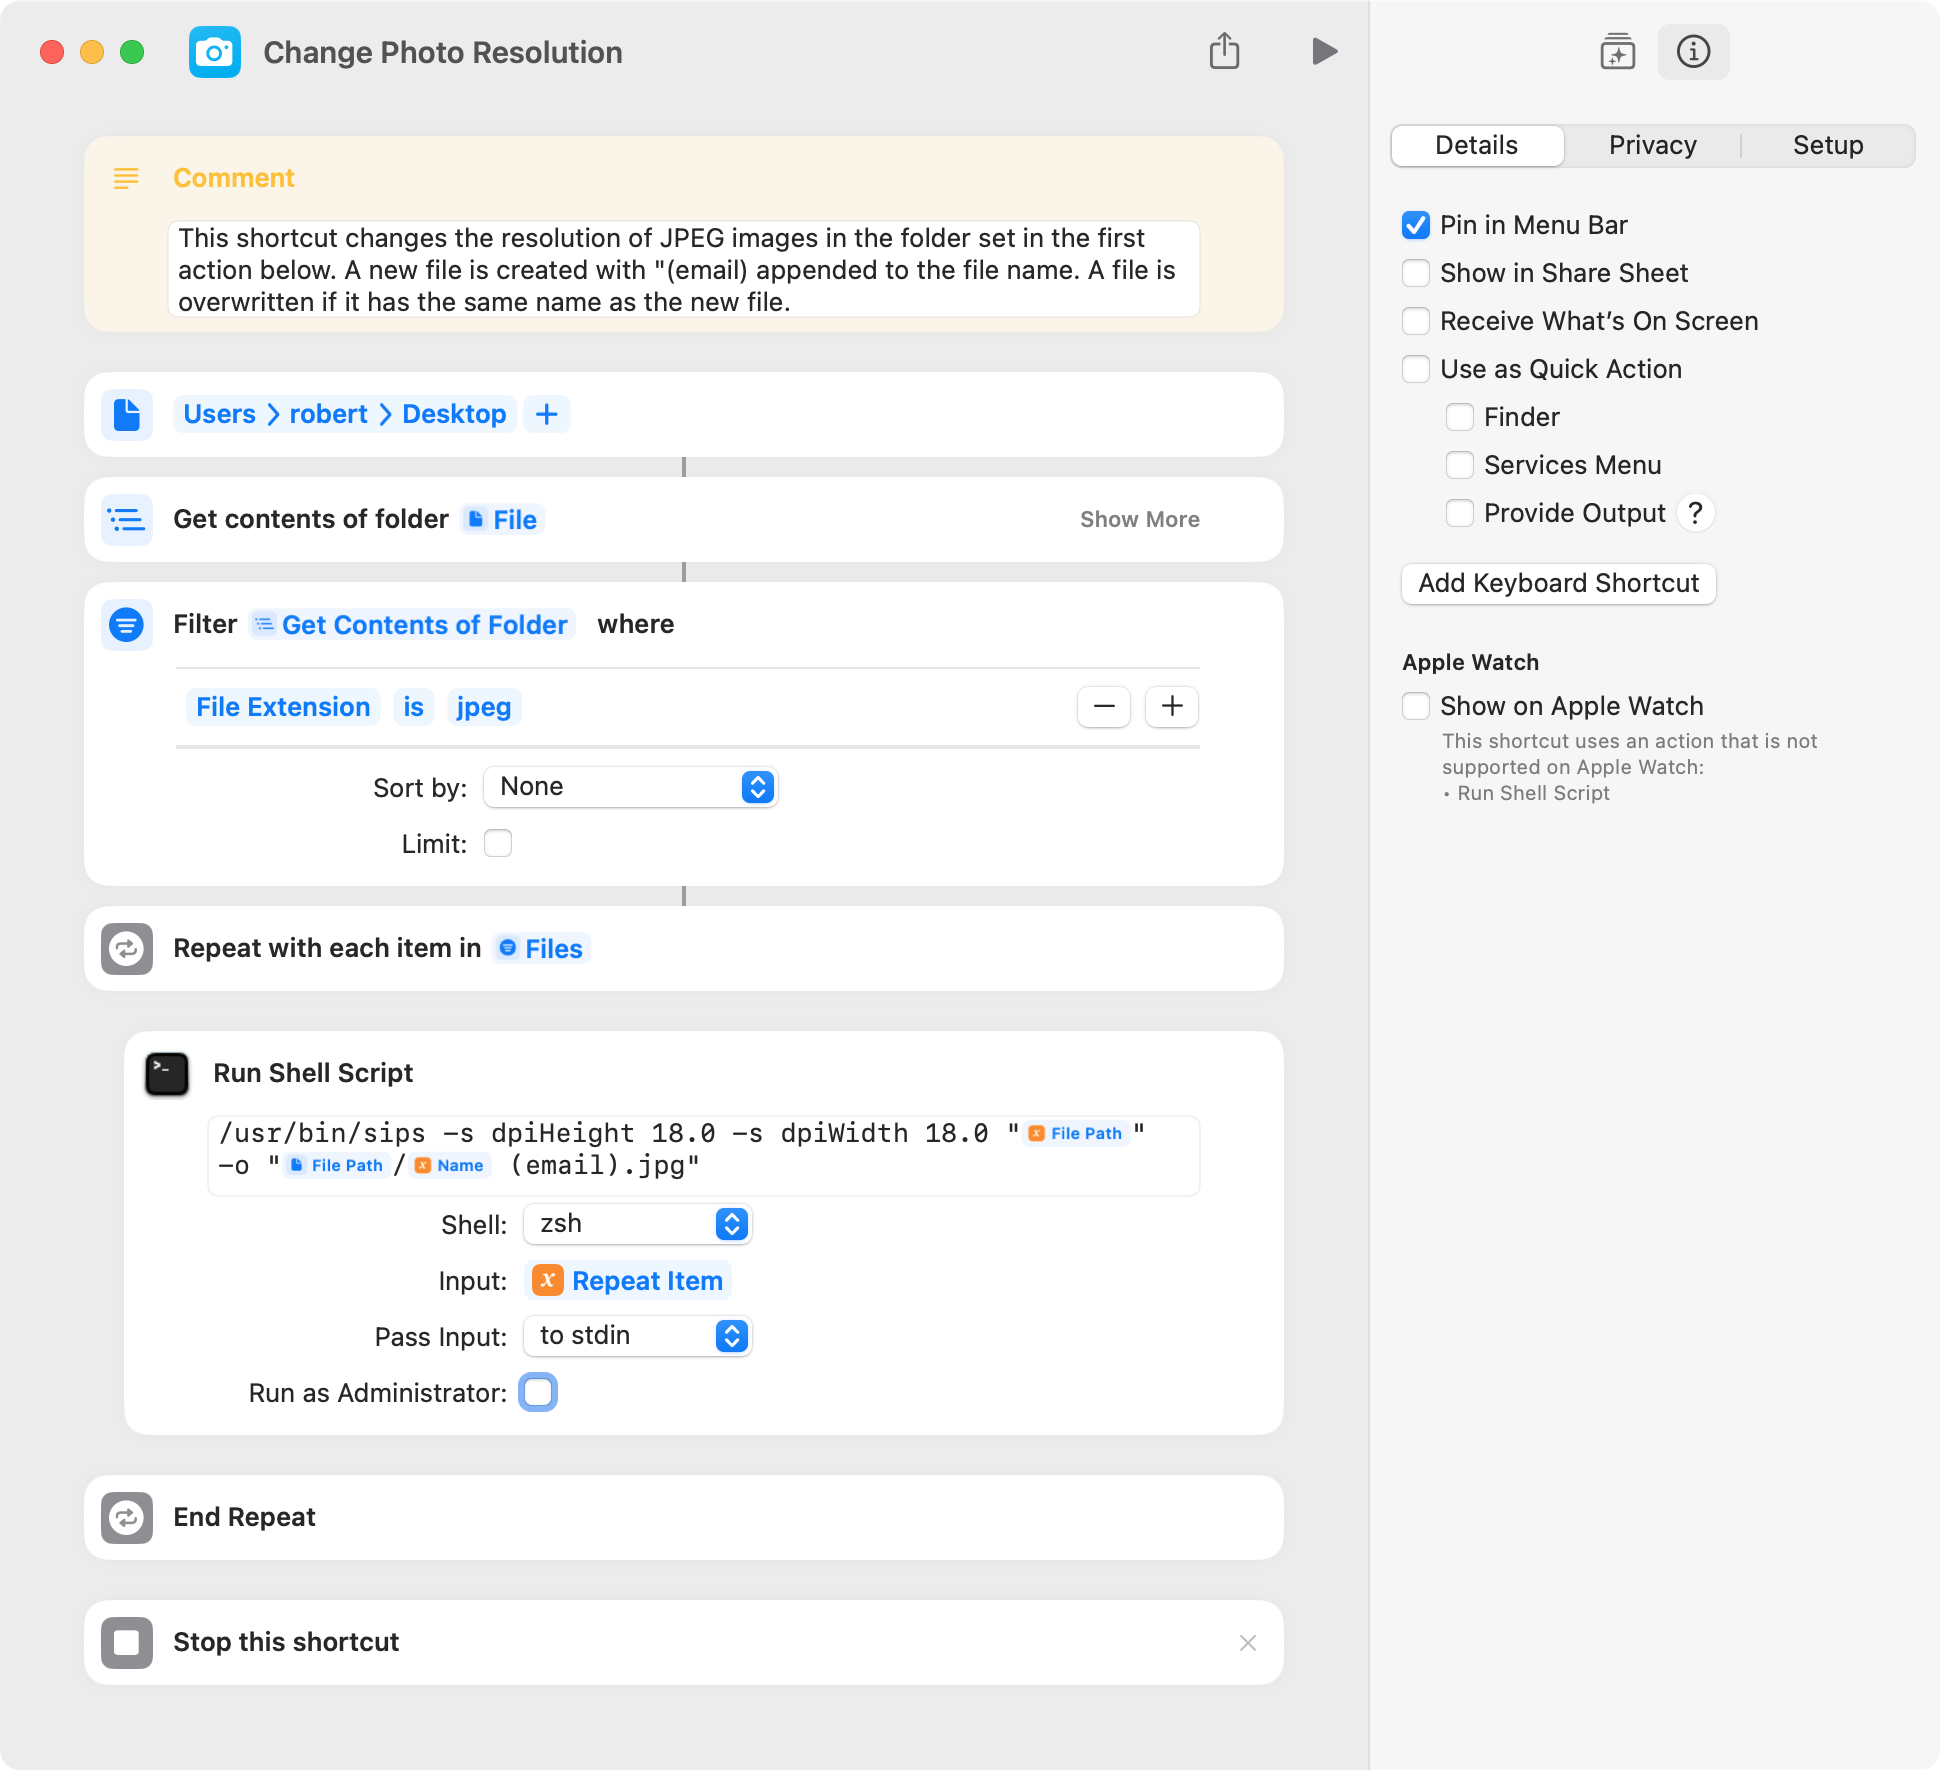
Homer712. I have a suggestion which takes a slightly different approach then you request. Instead of specifying resolution, this shortcut specifies a maximum pixel width and height. As written, new files are created in the source folder, but this is easily changed to overwrite existing files.
If you would prefer to use image resolution or to overwrite existing files, let me know and I’ll make that change. Or, you can probably do that yourself.
Tried, but could not figure out just where to include/substitute resolution for size. Just so you’re not redoing this a number of times for me. The files are always “.jpeg” files, and they are located in a folder on my Desktop named “Send”, and the resolution always starts out at the Photos standard of 72, which I need changed to 18. Thanks.
So it wasn’t just me, in a way that’s good. But, I think I’ll spend the afternoon trying to do this via an AppleScript, should be a good learning experience.
Homer712. I suspect you have a working AppleScript, but I wrote a shortcut solution FWIW. It uses the shell to set the resolution. A new file is created, but this is easily changed. You have to set the source folder in the shortcut’s first action.
You give me way too much credit. What I have found out is that doing a resolution change via AppleScript is pretty much impossible. This “sips” thing comes up almost everywhere I’ve looked.
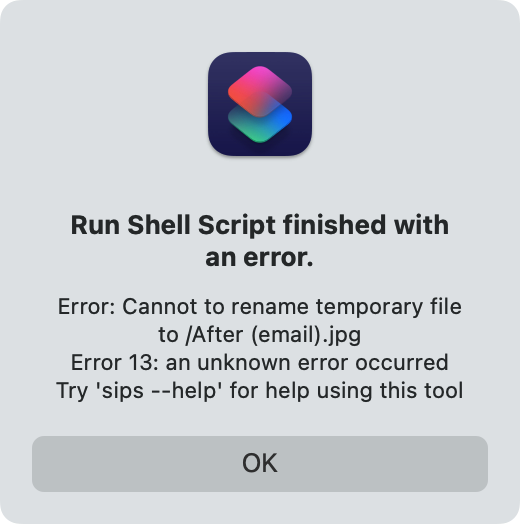
Your shortcut looks promising, but after running it I get an error (see screenshot).
Resolution isn’t really what everyone thinks it is. I’m not sure what is meant by ‘manageable’ in this context.
In general, your screen will display images at the screen’s resolution, unless you zoom in or zoom out. Resolution is constructively meaningful when the output format does not have a resolution, for example, when printing. Mucking around with resolution can mess up default viewing, so when you change it arbitrarily, it can be annoying for others depending upon their ‘viewing’ settings. For example, setting a typical image’s resolution to 18 makes it appear 16x larger when opened in Preview (depending on the settings in Preview).
I’m not sure what the objective here is but this is an unusual approach and there is likely an alternative that will be scriptable and have fewer side effects.
I should note that this is a convoluted subject and what’s above is a generalisation.
Homer712. I redownloaded and tested the shortcut without issue. The error message you are receiving would appear to indicate an issue with a file’s path. What is the name of the source file that begins with “After”?
Mockman. I agree with what you say, and that’s the reason I suggested the alternative approach in post 7. However, in response, Homer712 was quite clear that he wanted to change the resolution from 72 to 18.
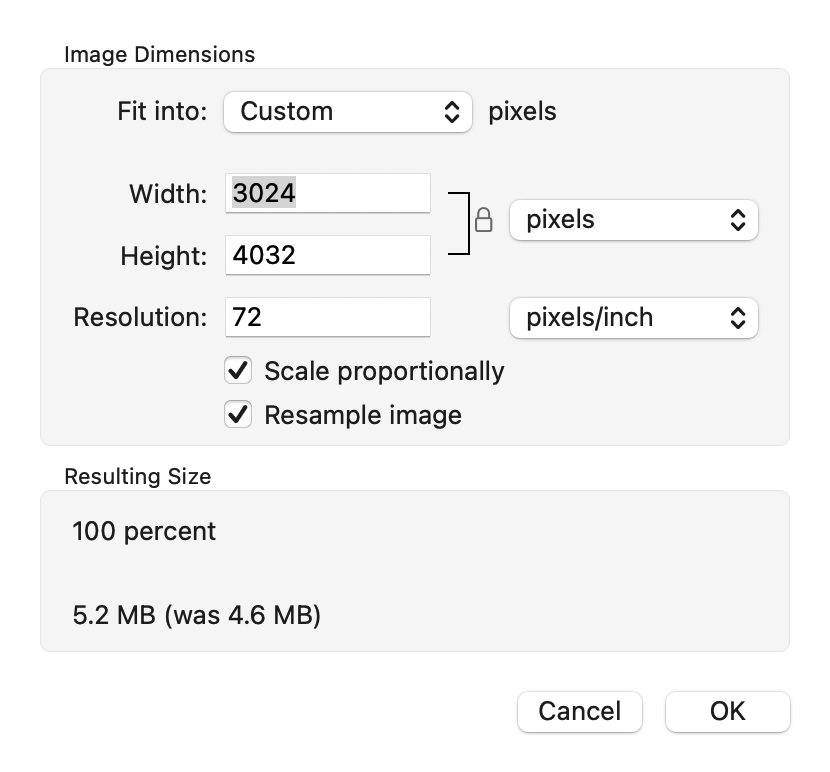
I’ve probably confused things by using the word “resolution”. If you drag an image from Photos to the Desktop, and then double click on it, it opens up in Preview (see screenshot_1). The resolution (at least in my case) is always 72, and the size is 5.2 MB (not manageable for email attachments).
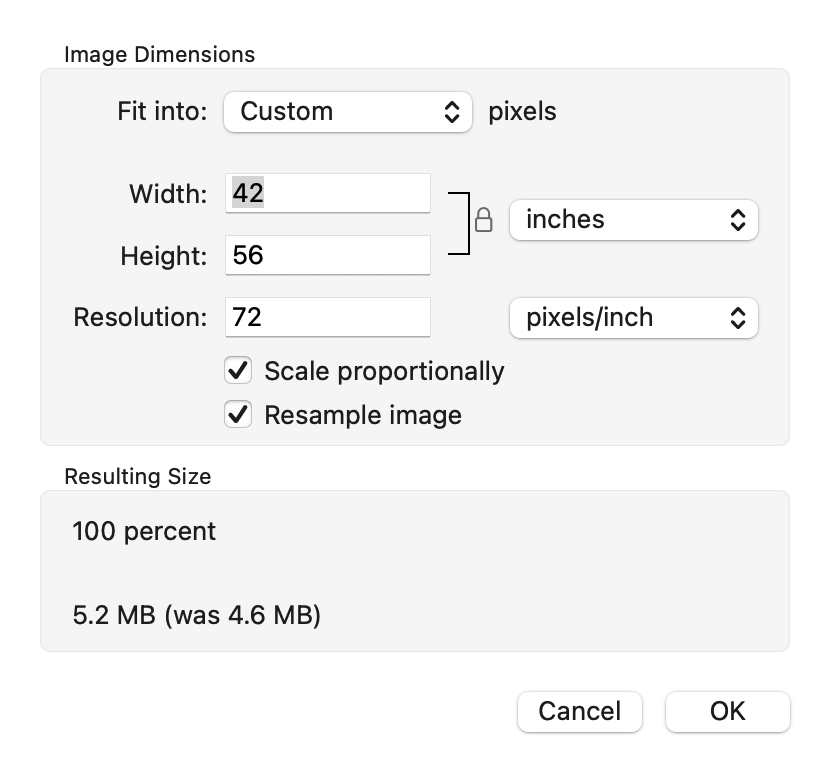
If you change that resolution (Preview/Tools/Adjust Size) down to 18 (see screenshot_2), you end up with a file that’s 444 KB (fine for emails). Same height, same width, just the file size changes.
I see. So, in my opinion, the proper thing to do would be to change the width and height and leave the resolution alone. If ‘scale proportionally’ remains checked, then if you change one dimension, the other will change correspondingly.
In this specific example, if you changed the height to 14 inches —basically, divide by 4 in either dimension— then the visual effect would be the same but the resolution would remain the default 72. You should find this a much simpler process to automate. You could use whatever ratio you wished but the equivalent of changing the resolution from 72 to 18 is 4:1. You should find the resulting file size to be identical to the image with its resolution changed to 18. You might find it helpful to change the units in that dialogue from ‘inches’ to ‘pixels’.
Aside: As to why it’s 72 when none of apple’s devices have a pixel-per-inch of 72? Well, back in the CRT display era, they did. And that was probably chosen because a ‘point’ is approximately 1/72 of an inch and is now treated as exactly that length.
Further aside: As I recall, windows used a 96 pixels per inch default. This often made font sizes look odd when moving word documents back and forth, with 12 pts looking like 16 and vice versa.
My shortcut in post 7 is functionally equivalent to Preview’s Fit into pixels option. I retested the shortcut without issue.
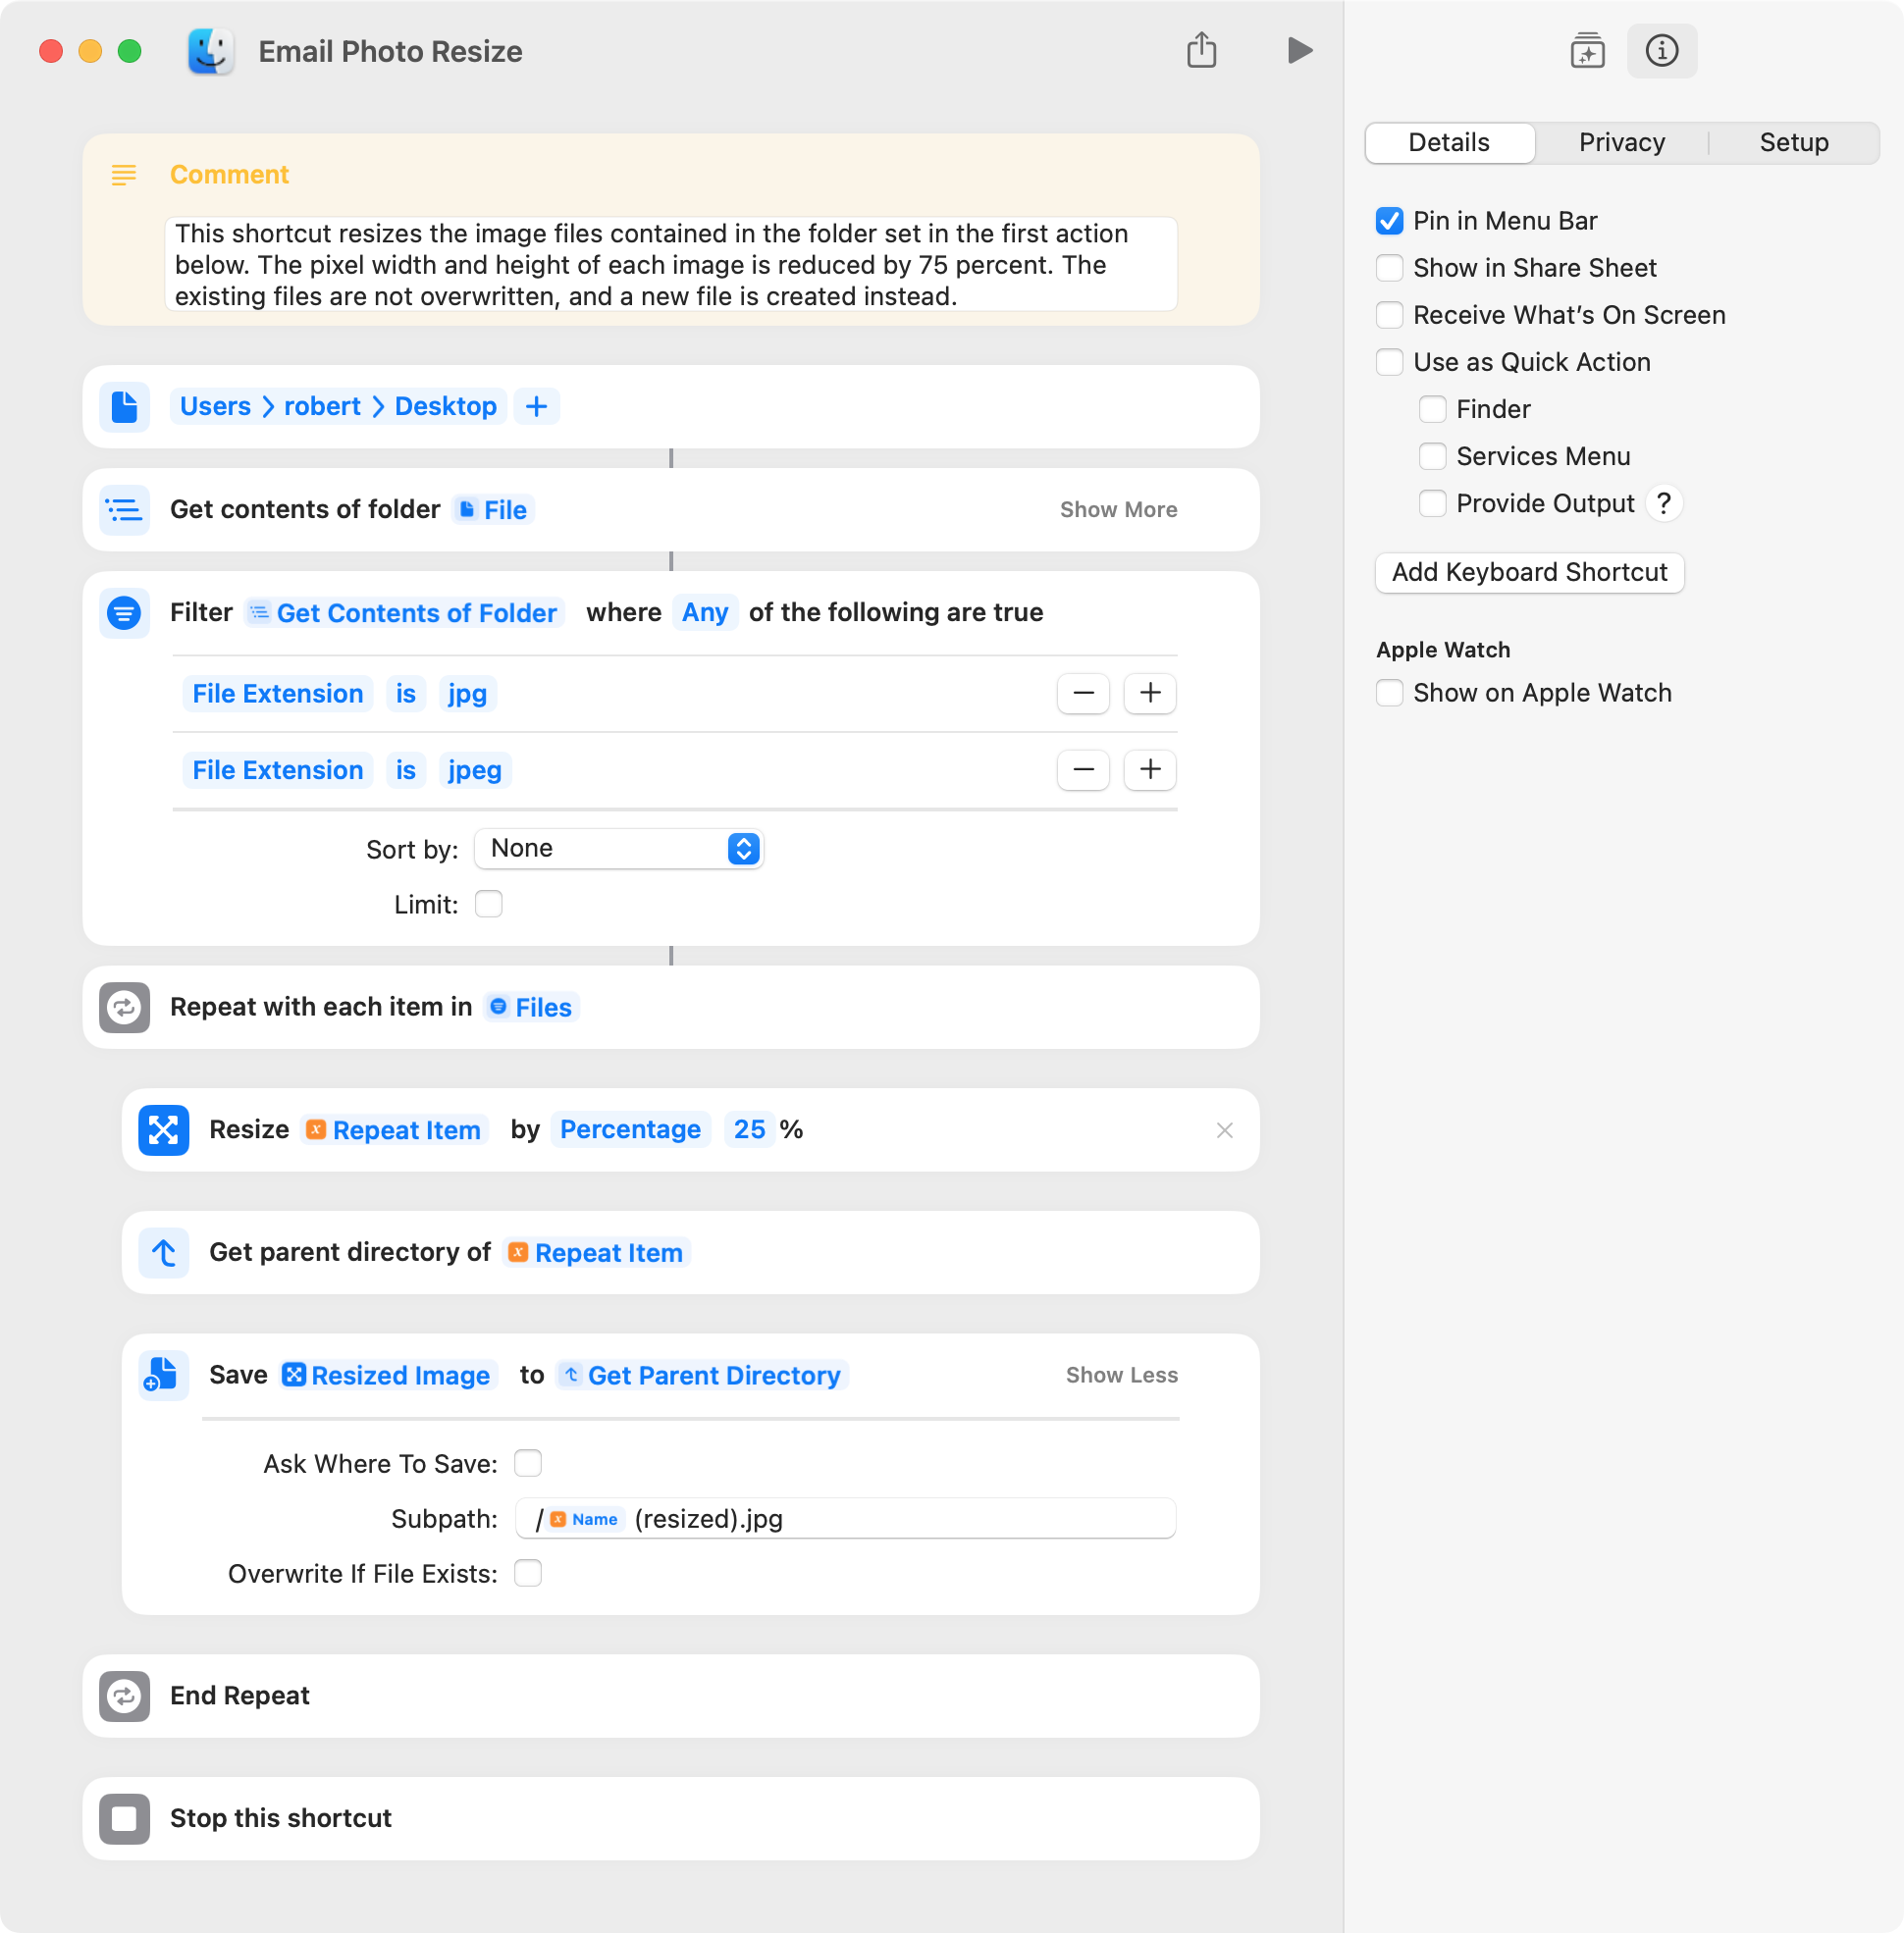
The following shortcut reduces an image’s pixel width and height by a specified percent. This is functionally equivalent to Preview’s "Width: percent and Height: percent options. You have to set the target folder in the shortcut’s first action, and I tested this shortcut without issue.
This is just a matter of personal preference, but I resize images to a maximum pixel width and height based on their intended use. For example, my social-media site accepts photos with a maximum pixel width and height of 2000 pixels, and so I use that. When I email someone a photo for simple viewing, I typically use a maximum pixel width and height of around 1024. Adobe has an informative page on photo sizes (here).
Homer. For some reason, that command will not run reliably in a shortcut. I’m sure there’s a reason for that, and I’ll look at that later. However, for a simple shell command, you might as well use an AppleScript:
do shell script "sips -z 1008 756 /Users/homer/Desktop/Before.jpeg"